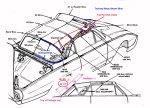
THUNDERBIRD
CONVERTIBLE TOP BACK BOW HEIGHT

(when measured from center of back bow to top of package tray (deck)

Year

Approx. Installation Time

Bow Height

1955-57

6.5 hr

19"

1958-60

8 hr

21"

1961-63

8 hr

23 1/2"

1964-66

8 hr

22 1/2"


"HOW TO...
INSTALL YOUR OWN CONVERTIBLE TOP"
Pictures and step by step instructions!
(instructions below pictures)
(click on the pictures to enlarge them)

nomenclature.jpg
Part Identification

13center_tray.jpg
Mark the Center
14center_window.jpg
Mark all centers!
15center_header.jpg
Mark header center too!
16tack_window.jpg
Tack Window Bottom
17tack_window.jpg
Tack Window Top
18staple_pad.jpg
Staple pad
19align_pad.jpg
Align Pad
20staple_pad.jpg
Staple inside Pad
21pad_aligned.jpg
Pad Aligned
22staple_wind.jpg
Staple Window Bottom
23long_pads.jpg
Long pads
24trim_pads.jpg
Trim Pads
25glue_flaps.jpg
Glue Pads shut
26insert support.jpg
Insert Supports
30open_partial.jpg
Partially Open
31staple_header.jpg
Staple Header
27position_corner.jpg
Position Corner
28back_qtr_flap.jpg
Back Qtr Flap
32front_qtr_flap.jpg
Front Qtr Flap
29staple_top.jpg
Staple Above Window
33caulk_staples.jpg
Caulk Staples
34tack_wire-on.jpg
Tack Wire-On
35tack_wire-on.jpg
Tack Wire-On
36done.JPG
Done!

If you see something I've missed or
that may be incorrect, please email me
Thanks!

Here are a couple places to get your tops:
Electron Tops
Hydro-e-lectric
Kanter
Hydro-e-lectric also has all the hydraulic pumps, cylinders and hoses you may need.
Kanter is the place to get the new tacking strip.
You need one type "F" and one type "R".
Screw or rivet the tacking strip to the package tray and header bow and usually
screws work the best for replacing the strip on the back bow.
I use 1/4" staples on the front, and 3/8" staples on the back bow
and package tray strip, and I use 1/2" staples on the wire-on.
  1. Before you remove the old cover, run your top up and down a couple times and make sure it isn't binding or pinching the fabric anywhere, and that both sides go up or down evenly. If there are any problems, correct them now.
  2. Lay the new cover on top of the old one while it is still attached just to make sure the new one looks like it will fit. You'd hate to rip the old cover off just to find out someone shipped you the wrong cover and you'll have to wait 2-3 weeks to get a replacement, especially if the weather is nice.
  3. Measure and record the distance from the center of the back bow to the top edge of the package tray (58-66) or top of deck (55-57) as shown here.
  4. Remove the rof rail weather strips. If they are cracked or torn, you may want to replace them now.
  5. Remove the header seal (61-63) and front bow seal (all), and replace if necessary or clean and re-use. (I'd replace the bow seal as thy are usually pretty crushed)
  6. Remove the "arrowheads" which are attached at the ends of the "wire-on" along the bottom of the back window and across the back bow (See picture). There should be new ones with your new top, but I always like to save them just in case you ever "lose" one.
  7. Remove both strips of "wire-on" and discard, pull all old staples from the tacking strips.
  8. Pull the top free from the tacking strip located under the header bow, and from the back bow and bottom back edge. (save for reference).
  9. Check the tacking strips and if necessary replace them, otherwise check again to make sure all the old staples have been removed.
  10. Place a strip of masking tape on the package tray just below where you measured the back bow height, and mark the center from each end as shown in the photo. Do the same on the back bow and header bow and then mark corresponding locations on the new cover pieces.
  11. Place the new window so the bottom back edge center is at the location marked on the package tray tape and put 1 or 2 staples into the center of the tacking strip. It's very important that your staples stay in a nice straight line as you place them so that the "wire-on" will cover them later.
  12. Measure up from the top of package tray 23 1/2" (61-63, or from chart above for other years), align this mark with the center of the tacking strip on the back bow and place a staple at this location.
  13. Place the pad with the narrow end toward the front of the car, leaving all excess to overhang at the front, (I know, I did it backwards on the car shown in the pictures above, but it is easier to trim the excess from the front) open it and staple it to the tacking strip at the back bow as shown.
  14. Align the pad along the bows with the "top" edge (toward center of car) against the "notch" in the bows as shown here.
  15. Pull the back bow with the window stapled only in the middle forward. Do not pull hard enough to pull the staples out. Align the top back edge of the pad with the notch in the back bow, open the pad, and place 1 or 2 staples into the tacking strip, working from the back forward. Do the same for both sides, keeping the back bow parallel with the header bow.
  16. Open the flaps on the pads and spray a little adhesive in them and close them again. This will keep them from opening and becoming unsightly as you raise and lower your top.
  17. Align the bottom edge of the rear window with the package tray (deck) and pulling taught, staple it in, Lift the header bow about 1-2" up off the windshield and prop it there, then pull the back window up firmly and staple to the back bow while pulling any wrinkles out.
  18. Remove the blocking under the header bow. Insert the #2 and 3 bow support strips into the sleeves on the new cover. Lay the new top on top of the frame, make sure your pencil center marks are aligned on the header and back bows, and that the heat sealed seam at the rear of the new cover is centered over the tacking strip on the back bow. Also check the front and rear quarter flaps for alignment.
  19. Zip your window to the new cover and insert the flaps together. Again, make sure the alignment is correct as in #18.
  20. Find the front edge of the header bow and mark a pencil line on top of the new cover at that point. Pull cover 1/2" - 3/4" past this mark and staple under header on tack strip. Make sure you maintain the center mark alignment.
  21. Use 3M #8080 Trim Cement on metal at quarter flaps, pull rear quarter flaps into position, and then front quarter flaps, leaving both long inside the car.
  22. Install all roof rail rubber, and trim excess quarter flaps after rubbers are in place.
  23. Position the lower back ends of the new top and staple in place.
  24. **LAST** Staple top across back bow (option: you may fold the fabric under as you staple) and no further than 5" past heat sealed seam, the end tips will go there.
  25. Trim excess top material at back bow (if left long on top, otherwise trim it on the inside) and Silicone over staples. Place and staple the wire-on, Silicone again over the staples inside the wire-on and close.
  26. Using an awl, poke a hole for the end tip. The screw must go through the wire-on and Silicone.
  27. Reinstall the header seal, lower the top and go cruising!

  28. Thomas G. Maruska
    Duluth, Minnesota

    Email me